As inbound marketers, our job is to attract strangers to the website, convert them into leads and eventually turn them into customers who will buy our products and services. We do this through several ways, including blog posts, content offers, landing pages and pricing pages.
Easier said than done! In fact, not only are most new leads nowhere near the buying stage when first converting, but almost 97% of all marketing-generated leads aren't ready to buy and will not make a purchase the very first time they enter your sales cycle.
97%!!! Where on earth are we losing these chaps? The answer lies in effective lead nurturing flows – or, more accurately – a lack of it. The good news, however, is that companies that excel at lead nurturing generate 50% more sales-ready leads at 33% lower cost. Source: Forrester Research.
Lead nurturing is the process of selecting a target audience, serving that audience with content that matches the stage of the buyer (whether that is awareness stage content, decision stage content and everything in between) and encouraging them to move further through the buyer's journey and get closer to making a purchasing decision.
From an inbound marketing standpoint, this is achieved with the effective use of email marketing. But who has the time to sit and pick out leads from your (hopefully expansive) contacts database, select the correct offer to send them, draft an individual email each time, etc.? This can be intensive work, even for companies that have full-time sales teams. Enter HubSpot Workflows.
The HubSpot Workflow tool allows you to set up a nurturing sequence with small, digestible steps that present leads with the most applicable ‘next natural step’ for them to take. In this tutorial post, I’m going to show you how to set up a Workflow in HubSpot for lead nurturing purposes.
You’ll need to be logged into your HubSpot Marketing account before following these easy steps to creating a workflow. So go on, sign in and we’ll get going.
9 Steps to Setting Up a Lead Nurturing Workflow in HubSpot
1. Create Your Emails
A lead nurturing workflow comprises a number of emails containing certain pieces of content that are automated to go out sequentially. Before you can add these to your workflow, you'll need to create the emails. Consider the offers you will be presenting, draft some compelling copy, pop an image in your body, add a call to action and make sure your subject line is incredible.
Once your emails are bedded down, be sure to select ‘send email with automated workflows’ in the sending tab. This will allow us to add this email to our workflow.
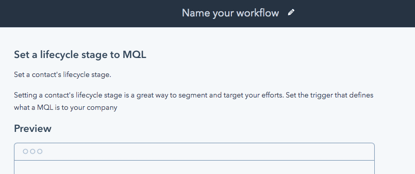
2. Create a New Workflow
Hop on over to the Workflows tool (which can be found on the top navigation bar).
Click on the ‘create workflow’ button.
Give your workflow a name.
Select your workflow type. There are five to choose from:
- Contact-based: Starts with a blank workflow that is triggered when someone signs on as a contact
- Company-based: Starts with a blank workflow and is triggered when companies are enrolled
- Deal-based: Starts with a blank workflow and is triggered when deals are created
- Ticket-based: Starts with a blank workflow and is triggered when tickets are created
- Quote-based: Starts with a blank workflow and is triggered when quotes are requested

For our lead nurturing purposes, we will use the 'Contact-based‘ workflow as it is the most common.
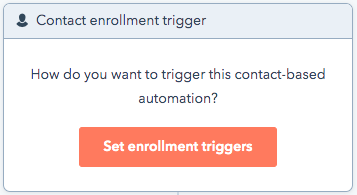
3. Choose a Contact Enrollment Trigger
A contact enrollment trigger is the action that a user takes in order to be enrolled in the workflow and start receiving your lead nurturing emails.
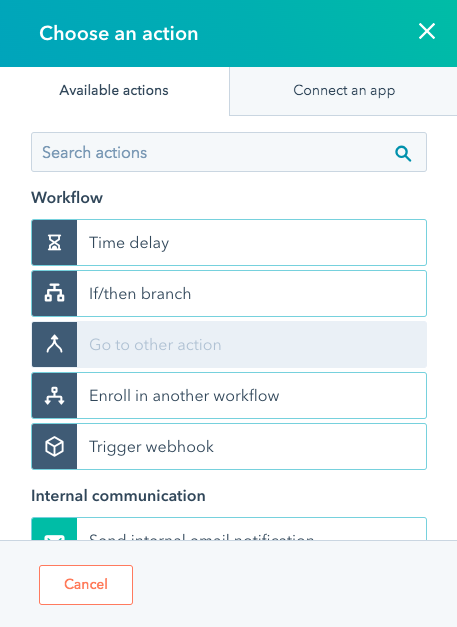
4. Add Your Steps to Your Workflow
It's time to enter the actions that you want to occur in your workflow and to key in how much time you want to pass between the starting condition (in our case, enrolled in our smart list) and when they receive the first email. For auto-responder emails, you would leave this to 0 days etc., as it would be an immediate send, but for our lead nurturing campaign, we are going to set it at 2 days. That gives our leads sufficient time to digest the initial content. The point is to be top of mind so we don’t want to wait too long either.
Now we click on ‘+’ to add more actions.
There are lots of options here but we’re going to be sending an email, so go ahead and select ‘send an email’ and then choose the applicable email from the automaton workflow emails drop-down list. (Note: You can also use the Create Email option here where it will open a new blank email for you to edit.)
As our workflow is specifically for lead nurturing, a single email may not be sufficient to move your leads along that buying cycle. An effective lead nurturing workflow will have at least 3 steps.
Go on and add your additional emails by adding a step with the plus button.
The panel on the left-hand side will update, showing you a summary of your workflow.
7. Save Your Workflow
Almost there. Click on ‘save workflow’.
8. Adjust Your Workflow Settings
Click on ‘workflow settings’ to adjust the settings. This panel contains quite a few options.

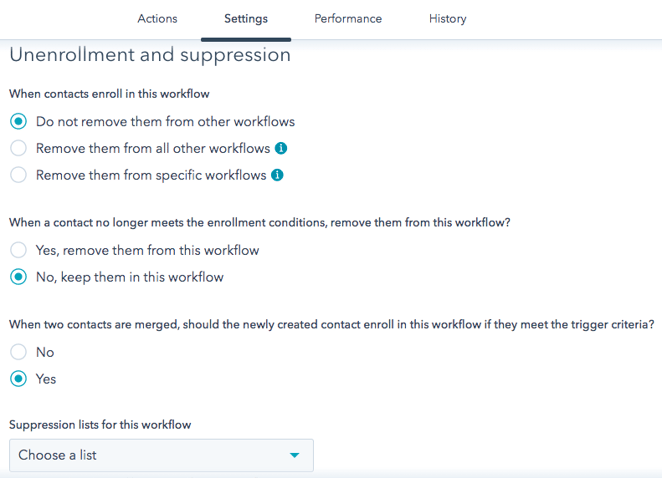
Workflow settings look at:
- Can the same contact enroll in this workflow more than once? If you’d like your leads to only receive this set of emails once, leave it set to No.
- Execute steps on business days only? Some emails may not be ideal for weekends. Selecting Yes will make sure that the lead only receives emails on work days.
- Execute steps only within a certain time range? This makes sense for time-sensitive offers such as holiday deal.
Suppressions and Priorities deals with:
- When contacts enroll in this workflow, remove them from all, none or specific workflows.
- When a contact leaves the starting list you have a choice to either unenroll them from the workflow or leave them to receive mailings.
- Suppression lists will override any of the starting options and ensure that people on other are not enrolled in this workflow.
9. Launch Your Workflow
Ready to rock ‘n roll! Click ‘edit workflow’ to return to the main screen.
Now click on the ‘workflow is not live’ dropdown and select ‘activate workflow’.
Excellent job – your workflow is now live and your selected buyer personas will start receiving your emails in due course.
As a HubSpot partner, we can help you manage your marketing technology or teach you how to manage and use it yourself!
Learn more about HubSpot in our guide.